

How To Setup Price Levels for Quickbooks Enterprise In 9 Steps
QuickBooks enjoys the lions share of the market when it comes to small business accounting for food and beverage distributors. This means that you are likely using QuickBooks Price Levels to manage custom prices for your customers.
Like most food and beverage distributors, you probably manage different pricing for your products for different customers. Whether your customer buys at a higher or lower price, it is important to keep track of these pricing differences in QuickBooks. You want to do this to avoid a situation where you are manually tracking pricing across hundreds of customers.
Surprisingly, not very many of the distributors that we work with know how to manage different price levels in QuickBooks. Below I will show you how to setup and manage different Quickbooks price levels per item per customer in QuickBooks Enterprise 2016. Also learn how to use QuickBooks Lot Tracking Here
How To Setup A QuickBooks Price Levels:
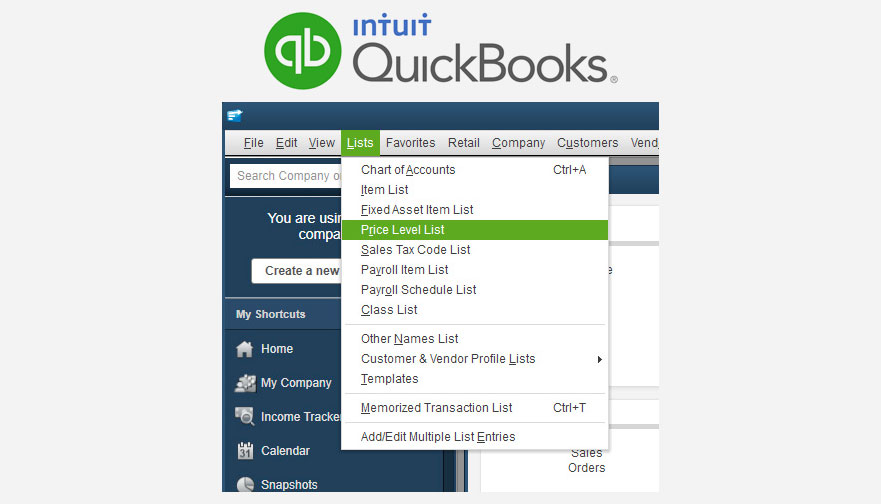
- On the top menu of QuickBooks, you want to hover your mouse over “Lists” and click Price Level List.

2. Once you click Price Level List, you will see a list of all Quickbooks price levels that you have created. In the image below, you will see three Quickbooks price levels that I currently have. Glasses, Drop & Go and Mona’s. To create a new price level, you right-click anywhere on the screen and click New.

3. Clicking new will take you into the screen where you will create the price level. The first step will be to determine a price level name. I always recommend that you name the price level the same or similar to the customer who the price level will be assigned to. In the example below I am naming the price level “Cool Price Level.”

4. The second step will be to select the price level type. There are two types of price levels. Fixed % and Per Item. The price level that I am using here is the Per Item price level. I suggest that you use this type when you want to specify a custom price for individual items for a customer or customer group. The fixed % price level, on the other hand, will increase or decrease all item prices for a given customer by the set percentage.

5. To apply a new price for the item BBQ Chicken 8pk, write the new price in the CUSTOM PRICE field.

Don’t worry about filling in any other fields for now. Just go through and put in the custom prices for each applicable item. If the item doesn’t have a CUSTOM PRICE, then leave the CUSTOM PRICE field blank. By leaving it blank, QuickBooks will automatically pull standard pricing.
6. To assign this price level to a customers, hover your mouse over the Customers tab and click on Customer Center.

7. Within Customer Center find the customer who you want to apply this price level to:
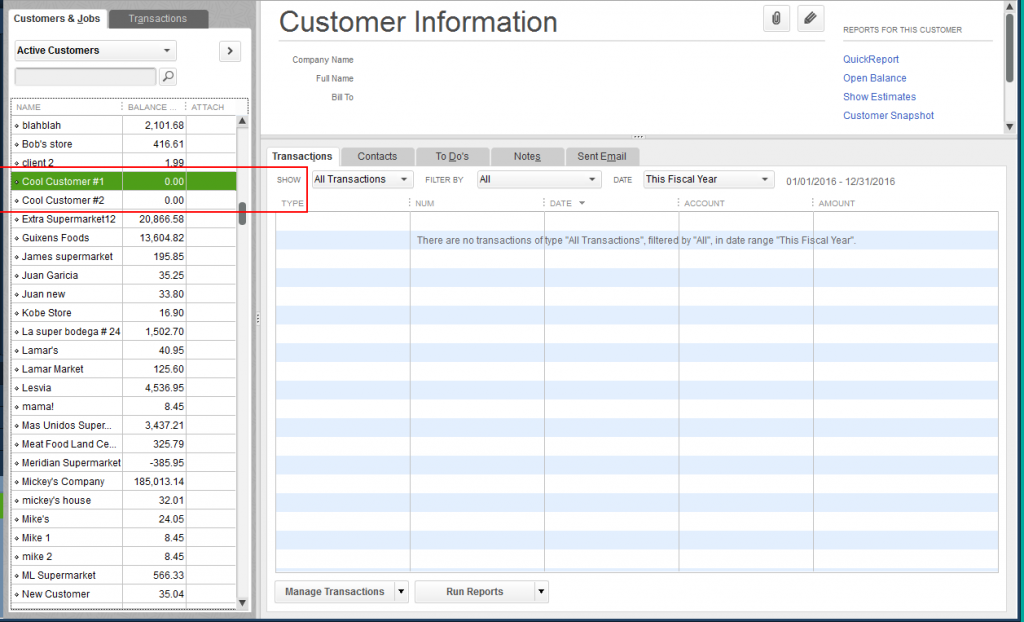
Double click on the customer who you’d like to assign the price level to.
8. After you double click, you will go into customer details where you will click on payment settings:
9. Within payment settings find the PRICE LEVEL field and select the price level that you created. Notice that I’ve selected the Cool Price Level created earlier.

*Click OK to save your changes. To test the price level you’ve just created, go to create an invoice.
9. Add the products from the price level you created onto the invoice. If you look at the pricing, it now reflects the pricing that you set in Cool Price Level.

Price levels like the Cool Price Level created above can be assigned to multiple customers or customer groups. Furthermore, with QuickBooks enterprise 2016 you can have up to 800 unique price levels.
Jack
November 11, 2016 at 12:46 amYour post is valuable , thanks for the info
Anonymous
January 28, 2017 at 8:06 pmThank you so much. Got it figured out and this is going to make life so much nicer for my data input staff
Kate
Divya
February 3, 2017 at 11:58 amHi,
Great points and can you explain about What is the best way to add revenues to QuickBooks for SaaS startups?
Thanks,
Divya,
Emelia Burchette
June 2, 2017 at 2:37 pmExactly. Nice Information
Elenore Zaborowski
July 18, 2017 at 3:22 amAmazing !!! This is an excellent